
 Beekeeper Studio Is A Free & Open Source Database GUI
Best SQL query & editor tool I have ever used. It provides everything I need to manage my database. - ⭐⭐⭐⭐⭐ Mit
Beekeeper Studio is fast, intuitive, and easy to use. Beekeeper supports loads of databases, and works great on Windows, Mac and Linux.
Video walkthrough
This year we released the first version of Beekeeper Studio, a cross-platform SQL editor and database manager. It is like VSCode, but for SQL.
Beekeeper Studio is built with Electron, a cross-platform desktop app development framework built on top of NodeJS and Chromium.
I did most of my Beekeeper Studio development work in Ubuntu, running natively inside Windows, using the Windows Subsystem for Linux.
WSL provides an awesome tech-stack, so in this article I’ll show you how to set up your WSL2 environment for cross-platform development.
Quick introduction to WSL 2
WSL, or the Windows Subsystem for Linux, is an official component of Windows 10 that runs a full build of Linux right inside of Windows.
I’ve been using WSL 2, which was officially released in the 2004 Windows update earlier this year. While WSL 1 had a slow filesystem and some package compatibility issues, WSL 2 is a full-blown Ubuntu linux install, so out of the box everything that works on Linux, works on Windows.
For this guide, I’m assuming you’re using Ubuntu 18.04 or 20.04 on WSL 2.
Once we have WSL 2 installed, we can boot it up (I also installed neofetch).

Double check you’re running WSL 2, by opening Powershell and typing wsl -l -v, if not, upgrade with wsl --set-version Ubuntu-20.04 2.
Setting up an Electron friendly WSL 2 environment
Here is the shopping list of things we need:
- Dark Mode
- Basic development tools (git, node, etc)
- An electron project
- Some way to view the electron app
- A code editor (not in the terminal)
1. Dark Mode
I’m only joking, but not really, go enable dark mode first.
2. Basic Development Tools
This is easy, we’re in Ubuntu! Lets just install a bunch of things we know we’ll need.
sudo apt update # this takes a while the first time
sudo apt install nodejs git npm # ~200mb of packages
sudo npm install -g yarn # Yarn is so much faster
3. Setting up Electron
Then lets make a quick Electron project. I think the easiest way to make an Electron app is with Vue.js, the Vue CLI, and the Vue Cli Electron Builder plugin. Let’s go.
# system libraries needed for electron
sudo apt install libnss3-dev libgdk-pixbuf2.0-dev libgtk-3-dev libxss-dev
# install vue cli
sudo yarn global add @vue/cli

# create a project.
# follow instructions here https://cli.vuejs.org/guide/creating-a-project.html#vue-create
vue create --default my_app
cd my_app
vue add electron-builder
# install dependencies
yarn install

# That's it!! We have a fully working electorn app. Lets run it:

yarn run electron:serve

# NOTHING HAPPENS!? Where's the app window?
# There's no way for Ubuntu or Windows to display it!
At this point we should be able to see our app window, but we can’t. Why not?
4. Viewing Linux Apps in Windows
Out of the box, WSL 2 does not have a window manager in which to display linux apps, so we’ll have to install one, and configure WSL 2 to use it.
Hopefully in future this will be supported out-of-the box, until then, we’ll have to install our own.
What we need is called an X Server. Searching online for ‘WSL X server’ will yield a bunch of conflicting advice about which one to use. Just skip all that and install VcsXsrv. Yes I know that is a SourceForge link, just do yourself a favor and install it using Chocolatey.
There are also guides about running a whole Linux desktop environment. Running a full desktop environment is totally overkill and not at all nessecery for our purposes.
To configure VcsXsrv you’ll need two things:
- An VcsXsrv config
- An environment variable inside Ubuntu to tell it where to find the X Server
VcsXsrv Config
Open VcsXsrv and it’ll guide you through three config screens. Here’s what to pick on each one:
- Choose Multiple Windows
- Choose ‘Start no client’
- Choose Clipboard and OpenGL integration, plus provide
-acas additional arguments


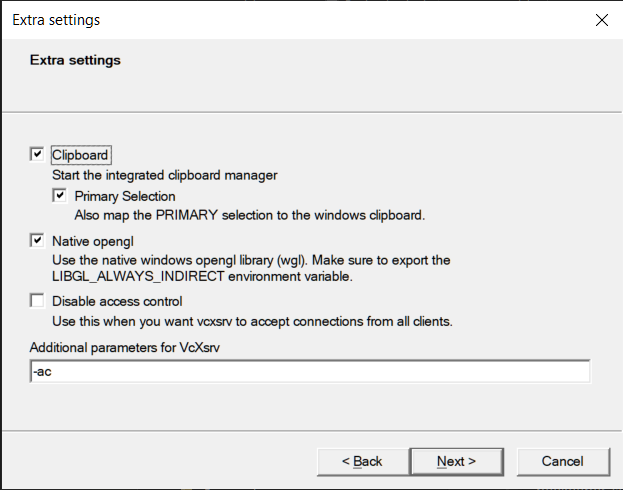
Save your config in your home directory for eash launching, then start the server. You’ll see the little X logo in your system tray. We’re ready to go.
WSL Config
# Add the following lines to your ~/.bashrc file:

export DISPLAY=$(cat /etc/resolv.conf | grep nameserver | awk '{print $2}'):0
export LIBGL_ALWAYS_INDIRECT=true
To test that you have everything working, you can try starting an app. Lets try the basic x11 apps to make sure everything is working.
sudo apt install x11-apps

xcalc
You should see the gorgeous x11 calc window.

Hey, that actually looks pretty good! Who needs the new Windows calculator anyway.
Oh wait, do you have a Hi-DPI screen and everything looks blurry? Ok you should follow this Stackoverflow post to stop the blur, or alternatively use X410 instead of vcsXsrv which supports hiDPI screens out of the box (but is a paid app). I simply disabled all dpi-scaling for vcsXsrv windows as I only have a 1080 screen.
Running Our Electron App
Now we can run our electron dev server again.
yarn run electron:serve
You’ll see a bunch of build messages, and if you’re lucky, you should now see your Electron app in all it’s glory

Great! Now when you make changes to your app it will auto-reload.
You can use yarn run electron:build command to create linux binaries.
5. Setting Up An Editor (And Other Tools)
You might think (like I did) that you can just use your normal Windows apps to interact with your new electron code. Well you can, sort-of, but the performance is terrible, like you’re editing code on a network drive (you are).
It’s best to think of your WSL environment as a totally separate place that simply co-exists alongside Windows. They’re like two cars side by side on the highway.
There are two ways to set up a code editor:
- Use the linux version of your favorite editor
- Use VSCode and the
Remote - WSLextension
Linux Apps
The only way to use whatever app you want is to run it in Linux.
Personally I commonly use Sublime Text and IntelliJ IDEA for code editing. So I installed them into the WSL environment, see for example the Linux instructions for Sublime Text.
One limitation is you have to start the editor using the terminal, for Sublime that means you execute the subl command. Another limitation is that WSL 2 does not currently support snap packages, so make sure you use deb or AppImage versions of whatever app you need.
Here’s a fun screenshot of Windows Sublime next to Linux sublime. They’re basically identical in form and function, you’d have a hard time telling the difference.

Don’t worry about the performance of these apps, IntelliJ is a heavy-weight IDE, and it works great with this set-up.
VSCode
VSCode offers something unique. There’s an extension you can install for Windows-VSCode called ‘Remote - WSL’. This allows you to just use the regular Windows VSCode. Once installed, you can open a directory in your linux terminal with code ., and it will magically open in Windows VSCode.
It works great, and is a fantastic show piece of how deeper WSL2 integration could happen for other apps in the future.
Here’s me editing this blog post in VSCode running against WSL:

WSL Gotchas
While WSL truly is fantastic, it’s still an early technology not without some quirks. Here are a few things that might happen, and how to fix them:
-
X Windows close on suspend. Yes, if you suspend your laptop your GUI windows from WSL will disappear. It’s frustrating. For Sublime Text simply start them again with
sublfrom the terminal -
HiDPI futzing. If you have a High DPI screen you might need to tweak things a bit to get linux windows looking good. This is a one time thing, but still something to watch out for. Paying for X410 fixes this, and Microsoft plans to fix this themselves in an upcoming release.
-
Separate Firewalls. WSL runs in its own virtual network. This means it does NOT respect your Windows proxy or firewall configurations. If you are behind a corporate firewall and you try to
apt installyou’ll get an error. There’s not a good workaround here other than manually figuring out your particular organization’s primary firewall settings. -
VM Memory Growth. If you run some memory-heavy processes in WSL, Windows might not be able to reclaim the memory they used. You should see an entry in your system monitor for
vmmem, which rarely goes down (but it does go up). If it gets too large you have to restart your machine, or at least restart the WSL instance. As I write this mine is at 4gb, although I haven’t restarted in a week. You can kill running WSL processes withwsl --terminate, then just open a new bash shell.
Wrap-up
Hopefully you should be well on your way to building Electron apps in Windows with WSL 2. I’ve found running Ubuntu under Windows to be a dream, and has prompted my return to Windows as my primary OS for the first time in a decade.
Seeing as you made it this far, please check out Beekeeper Studio, the open source SQL editor and database manager of the future. (we hope!)